Over the past couple of weeks I have been working on the Triton frame. Lots of cutting and grinding to remove all the engine mounts and tabs as well as all the cross members.
I never really liked how unit engined Triton's look with all that space around the engine, not to mention the ridiculously large alloy plates used to couple frame and engine.
Before:
So I had this crazy idea to cut 2.5" out of the frame to tighten up the front triangle as well as allow me to lengthen the swing arm while maintaining the perfect wheelbase.
After:
I am very, very happy with how the proportions look now!
Saturday, October 30, 2010
Sunday, October 24, 2010
roundy round...
Spent some time working on the Triton today. The fork is an old school leading link design and I want more torsional rigidity out of the front axle so it can act as the bridge to keep the leading links aligned perfectly and kept from moving independently.
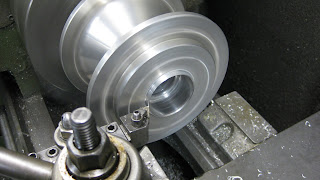
First step was digging out the old Sportster wheel I had laying around remove the stock bearings. Then I cut out the hub so I could chuck it up on the lathe to fit these suckers:
The bearings have a 2"OD and a 1"ID. Once the hub was out and on the lathe I bored out the through bore of the casting to accept the much larger bearing spacer.
Next step was to remove the existing flanges that held the dust seals
and face the brake mounting surface in preparation to re-bore the bearing seats.
Once the bearing seats were carved in I decided I wanted to sculpt the hub flanges a little. Gave them a little more of a bicycle hub look by rounding out the flanges. Not sure if you are even going to see these behind the duel discs but it is in the details, right?
Tuesday, October 19, 2010
Special #6 is looking for a new home...
Unfortunately it is time for her to move on. I recently upgraded her with a new lithium ion battery and a new aluminum battery box that not only holds the battery but now there is room for some tools... something I always wanted to add to the bike. I will miss her but I need to get moving on next years AMD World Champion ;)
Special #6 on Ebay
Sunday, October 17, 2010
Saturday, October 9, 2010
Finally we have shirts!
I apologize for this taking so long but we finally have t-shirts. Our first order was totally screwed up and printed incorrectly but the second batch came out great. We ended up using a couple more colors than we first expected so there are some choices. The options are:
Medium in Light Grey only
Large in Light Grey, Sand, and Light Blue
X Large in Sand and Light Blue
For those who wanted shirts please let me know your preference. The cost is $18.00 with shipping for the first shirt, $15.00 each after that.
Please send me an email to reserve your shirt and receive my paypal info.
I will contact those that have already emailed me to confirm your order.
Thanks for your patience everyone!
Chris
the Beezerker captured
I know I have lots to catch up on for the past few months have been busy and my posts spotty at best. A month or so ago I rented a crazy big studio space and my friend Ron shot some absolutely beautiful images of the bike. We are planning on selling a
limited number of prints on the web site if people are interested.
Link to Ron's work
Side View
Front View
Rear View
Subscribe to:
Posts (Atom)